
Firmware 101 for Startup Founders
Demystifying principles of firmware development

Whether you have changed a TV channel, or used a washing machine, you would have come into contact with firmware in some form or another.
Firmware can be considered a dark-art, however it becomes easier to understand when explained as part of an electronics system.
When building an electronics device, it is essential to understand how the electronics and firmware interact with one another.
The aim of this article is to outline key principles so that a founder or manager even with zero firmware knowledge is can by the end of the article look at two real snippets of code and understand which ones are better suited for their application.
We’ll go over the following topics:
Where do we start?
What’s a microcontroller?
What controls the microcontroller?
Types of firmware
Where Do We Start?
The first step to building a device is identifying its functionality and requirements and using those requirements to decide what components it may need.
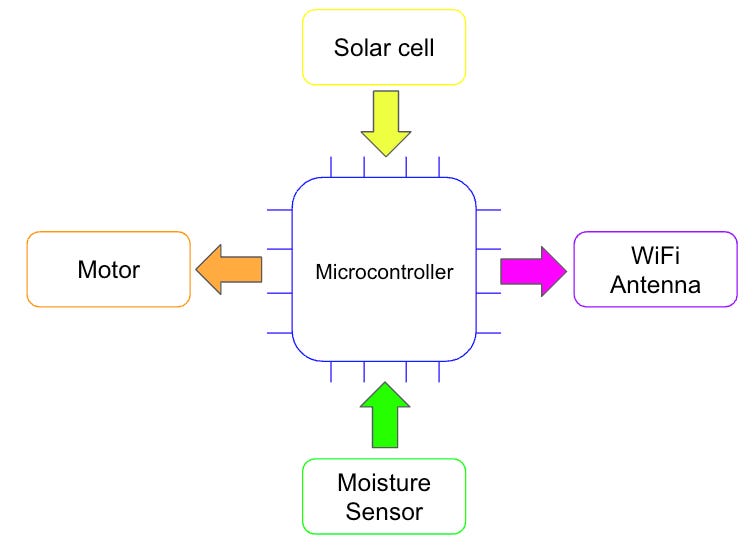
If for example we decided to build a device to water a plant autonomously, the device may have the following requirements:
To measure the moisture level of soil
To release and hold water from a tank
To have it powered by sunlight
To send status information to the user over WiFi
We can fulfil these requirements with the following components:
To measure the moisture level and dryness of soil - a moisture sensor
To release and hold water from a tank - a motor
To have it powered by sunlight - a solar cell
To send status information to the user over WiFi - a WiFi antenna
What is missing from the list however, is a component that can act like the brain of the device - something to read the moisture level, release and hold water based on these readings, send information over WiFi and of course, receive power from the solar cell.
That component, is a microcontroller.
What’s a Microcontroller?
A microcontroller is a chip, that can read and process input states and set output parameters.
It contains something called a central processing unit (CPU), memory and other peripherals such as input and output pins. (You may also hear the term “microprocessor” - their difference is that a microprocessor only contains a CPU).
In our example, the microcontroller is the component that reads the moisture level, controls the motor and sends data over WiFi.
Our system’s architecture can be illustrated using diagram below.
Microcontroller Selection
To decide on what microcontroller specifically to add to a design, some examples of include:
ESP32 - by Espressif
STM32 - by STMicroelectronics
nRF52 - by Nordic Semiconductor
Deciding which one to go can be based on:
Availability
Price
Technical suitability to the application
Team members experience and knowledge on using each one
Each of these microcontrollers have their own build systems and toolchains. - move
For our plant-watering device example we may want our microcontroller to have the following requirements:
High availability - as we want to manufacture and sell 100-500 in the next 6-12 months
Relatively low cost - as we want to have strong unit economics on these sales
Low-power - high importance as we want the device to be solar-powered
After some research, a strong candidate is the ESP32C3 series microcontroller, as it has an in-built WiFi antenna (with pre-certification) and is well-stocked with over 20,000 available from some suppliers and has a unit cost of £1.39 (at the time of writing this).
Some requirements may be compromised over others, based on project-specific priorities.
Costs outside of bill-of-materials should also be considered, such as if an engineer on the team has experience using one microcontroller over another, the time taken to build the device may be less and therefore cheaper in terms of development time.
Development Boards
Development boards are circuit boards which are built around a microcontroller.
They are are used for validating and verifying key design decisions around both electronics and firmware, with easy access to pins, that developers can plug cables in and out of.
When compared with software development, testing and iterating PCB designs cannot be done as quickly or cheaply, as designs need to be manufactured, assembled, delivered and then tested.
Mistakes in the electronics design phase, although not uncommon, are therefore more costly than in conventional software design (e.g. app development, web design) - making design verification steps more valuable.
Development boards and their ability to enable access to the pins of a microcontroller can be used in combination with other hardware development tools (such as breadboards, cables, and sensor boards) to test circuit designs and code, while working around the testing constraints of hardware development.

People who are learning firmware and electronics may have been introduced to Arduino, which is a development board with a simpler programming environment and very popular for education and rapid prototyping of ideas.

In our example we may decide to use an Arduino to prototype our idea, validate our plant-watering concept and show investors.
Many people have actually built devices that water plants autonomously using Arudinos and are a great way to learn how an electronics system works.
After we demonstrate our concept with the Arduino, a development board for a more industry standard microprocessor (like the STM32 one shown) can be used to ensure circuit designs work as planned.
What Controls The Microcontroller?
In our plant-watering device example, we landed on an initial draft for how the architecture of the system could look, what the microcontroller reads, and how it could respond.
What we have not addressed yet, is how our system sets the following parameters:
The moisture level threshold before water is released from the tank
The angle that the motor actuates for it to release the correct amount of water?
The WiFi credentials to send data to. How would a user set these credentials?
These parameters are set by the firmware.
Firmware is a type of software that is uploaded (or flashed) onto microcontrollers and dictates how they behave and operate.
For it to do so, it falls in between what is known as a typical software, and hardware - hence the name being firm-ware.
Firmware is typically written in C, as it is a low-level language that can interact with hardware, without the same level of abstraction as relatively higher-level languages such as Python and JavaScript (used for data and app-development for example).
As well as programming the device’s actions, it is in the firmware we see more technical, lower-level information relevant for components the microcontroller interacts with.
Types of Firmware
After looking at the basic principles of firmware and how it fits into a hardware system, we can look into the two main types of firmware.
Bare-metal
Real-time operating system (RTOS)
Bare-Metal
Bare-metal firmware involves executing a task, or multiple tasks in a loop.
Running on a loop means it performs actions one after the other and then repeats them.
It is simple, lightweight and low-level enough to interact directly with the hardware of the microcontroller it is running on.
Real-Time Operating System
RTOS firmware operates by running multiple tasks in a way that seems simultaneous.
Actually running tasks simultaneously would not be possible with one microcontroller, however RTOS firmware can rapidly switch between tasks, and uses task management and scheduling to decide which tasks runs at the correct time, and ensures they are completed within defined time constraints.
Example Code
An example of how firmware code, written in C could look for both bare-metal and RTOS is shown below.
If you do not have experience with coding or programming, these examples are mainly to show the structure of the code. In the bare-metal example, look out for the void loop() function, and see how the RTOS example may differ.
A bare-metal firmware example would look something like this:

RTOS firmware looks something more like this:
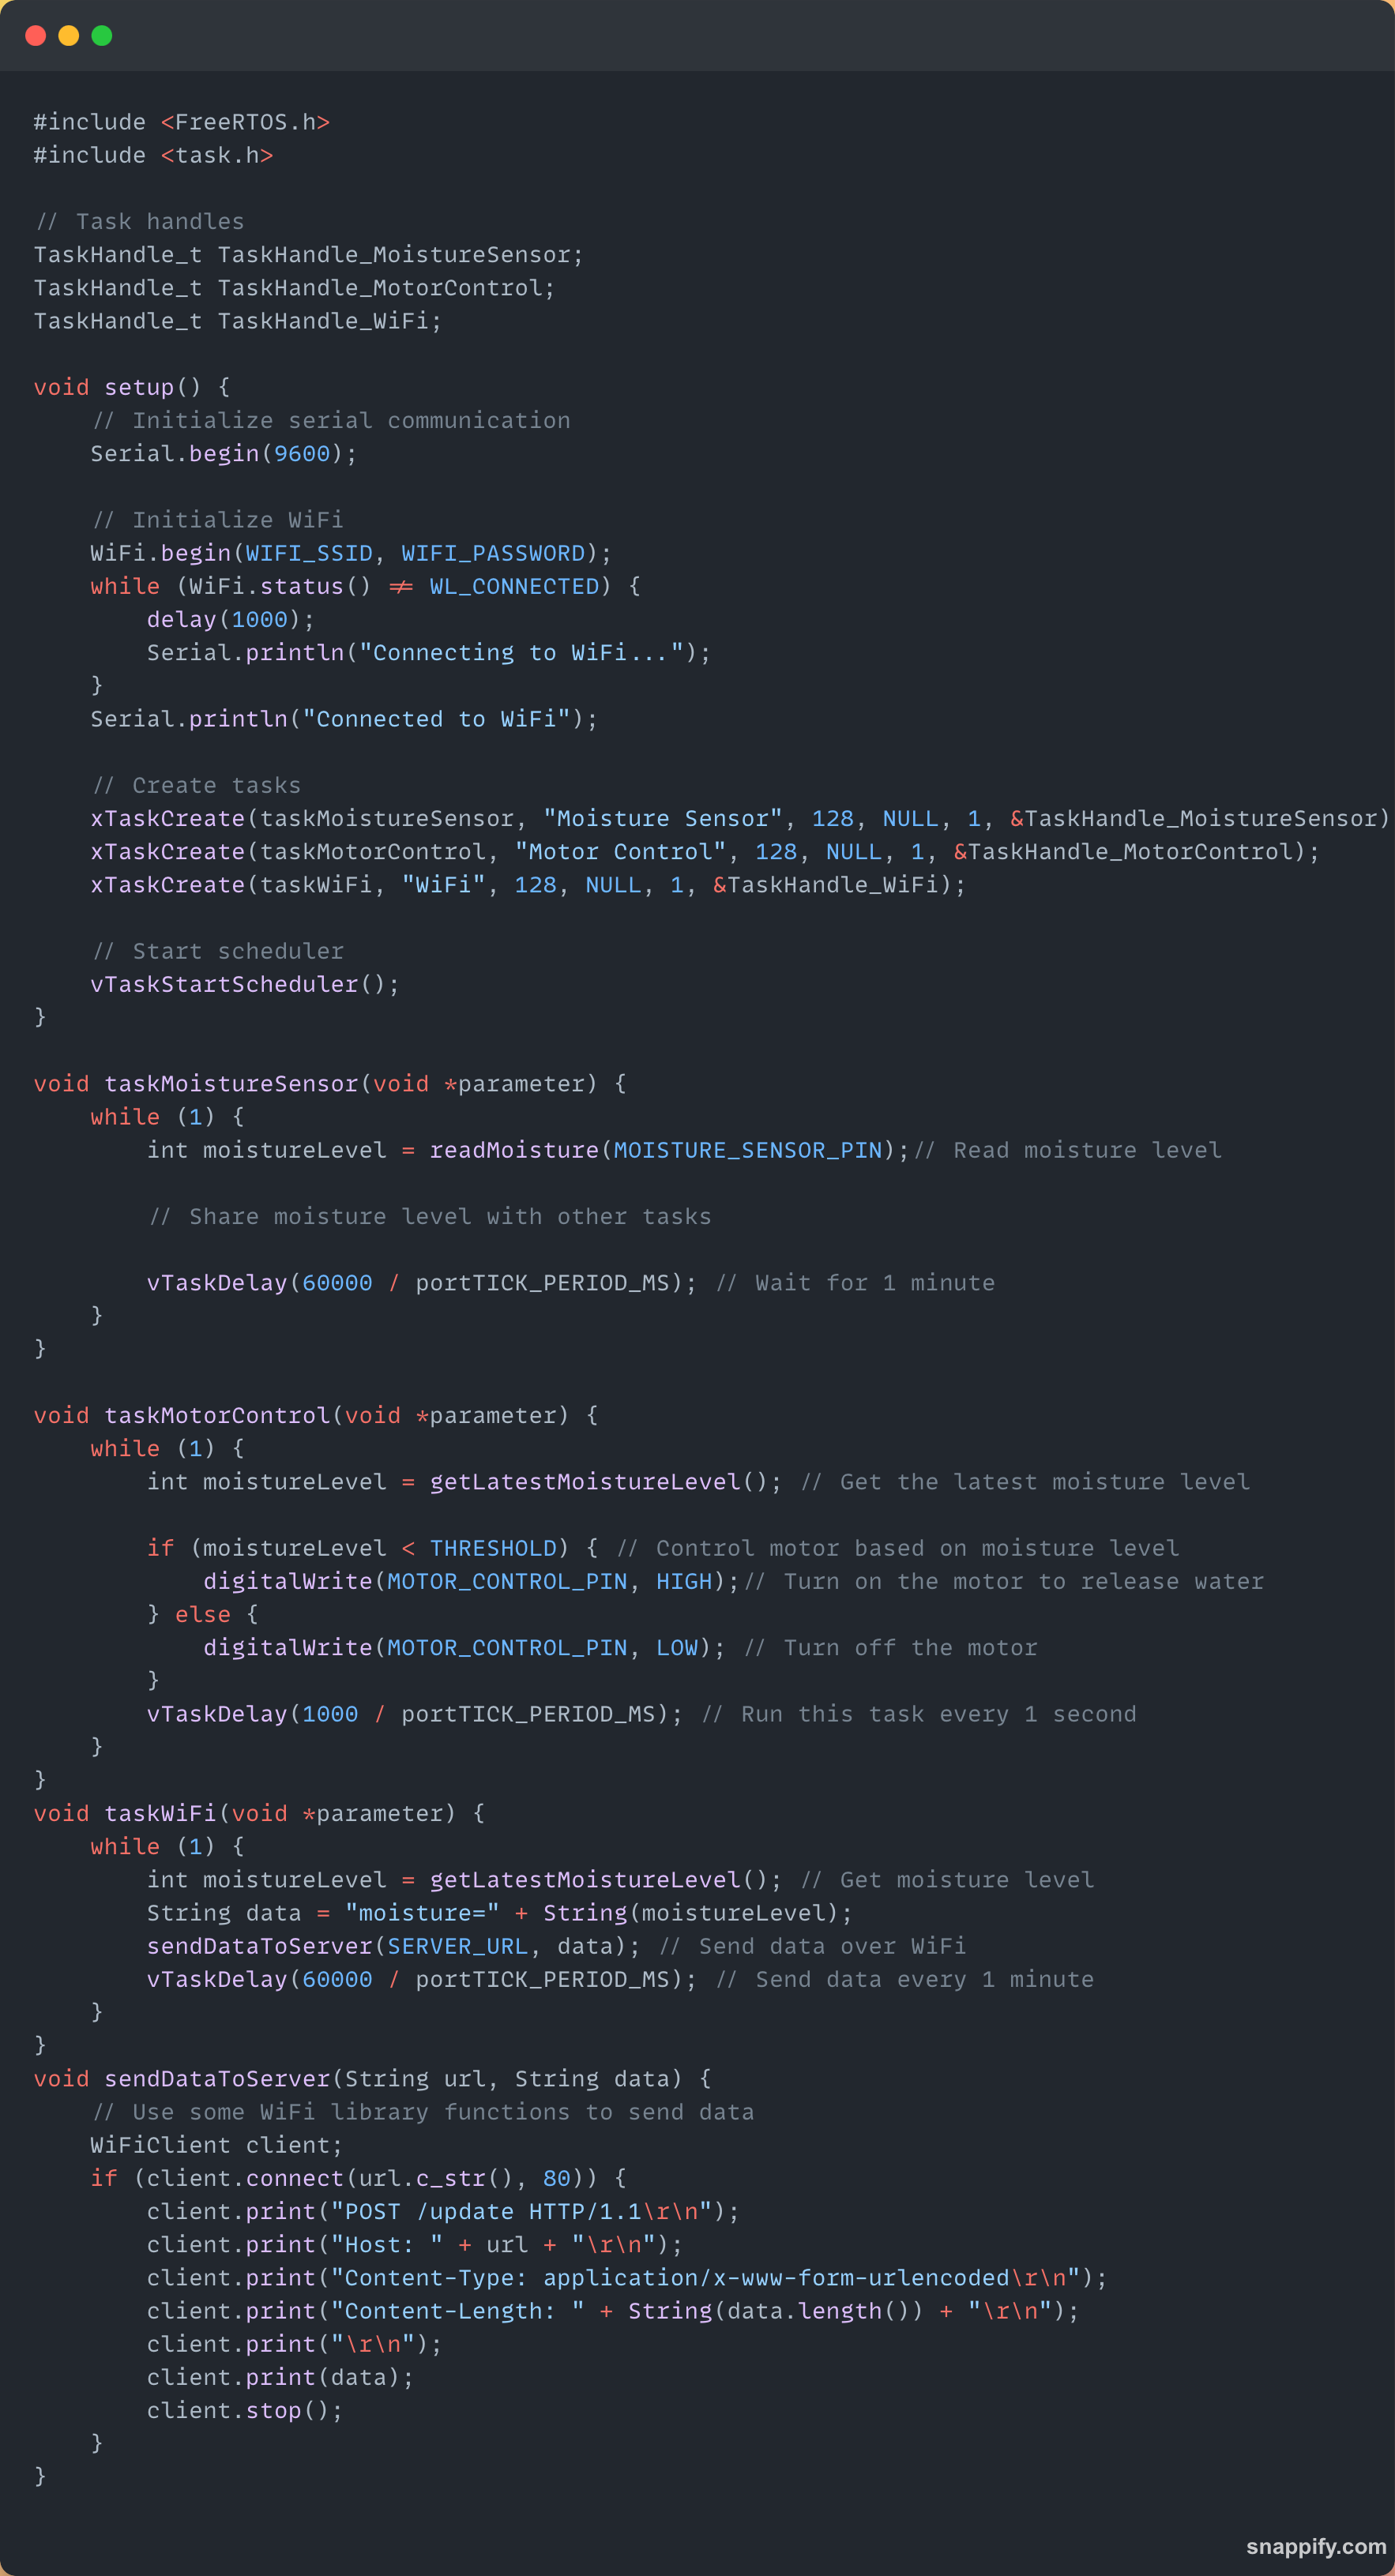
As described earlier, the bare-metal firmware executes its tasks inside “void loop”, whereas there is more abstraction with RTOS firmware, where the code shows the different tasks individually not part of a loop.
RTOS is typically chosen for more complex systems that require multitasking and prioritise reliability such as:
Industrial automation systems
Medical patient monitoring systems
Communication satellites
Avionic systems
For our plant-watering device example, bare-metal firmware would be a more suitable option as there are relatively lower amount of tasks to be carried out.
Managing Firmware Challenges

Understanding firmware principles is an important step to managing a project, however it is important to take what we have discussed so far and understand what challenges firmware development entails.
Many managers and founders apply principles of conventional software development to firmware, leading to inaccurate estimations of:
Cost
Timelines
Risks of delays
The misunderstood challenges of firmware development and how to manage against them include the following.
Compliance
To release a product into market, your hardware needs to adhere to regulatory compliance standards, and testing your device to these standards requires research and the use of a test-house, which costs a significant amount of money.
The types of tests and costs depends entirely on factors such as intended use, industry and market.
My advice to founders is to speak to test houses early in the development phase, gain advice from other founders in your industry and look for test houses that provide consulting to startups (e.g. Unit 3 Compliance in the UK).
Hardware Dependencies
As mentioned throughout the article, firmware is run on a microcontroller and interacts with other components on your board.
If there is an unexpected component availability issue, your firmware may need refactoring at worst and redevelopment at best.
Alternatively, if there is a new feature to add to the hardware, a circuit design change may very likely require more firmware development.
Toolchain Setup
A toolchain is a series of tools that developers use to develop, build and upload (or flash) code.
Although it may seem trivial, setting up a toolchain for hardware development is more time consuming than with conventional software development.
Every microcontroller manufacturer has their own suite of tools, with their own operating system (e.g. Mac, Windows, Linux) compatibility and installation processes.
Physical access to the microcontroller to upload code is physical and a mistake in one trace or signal requires manufacturing again with the correct design.
In practice, setting up toolchains at the beginning of a project or even receiving work from a handover from consultants are common events that lead to time-sinks in projects.

Debugging
When unexpected behaviour is observed in hardware devices, the source of the issue can seem illusive.
Debugging conventional software is not a trivial process, but with hardware one observed fault can be the cause of:
Low power
Manufacturing defects
Design faults
Firmware bugs
The natural process of debugging hardware (which includes firmware), is naturally more extensive, and requires a holistic approach to problem solving.
Although best practice is never to blindly test and iterate, it does take time to rule out sub-systems being the source of error and in practice provides a different set of challenges to debugging conventional software.

Is it Worth It?
If we want to develop technology that changes the world even in a small way, or has a high-impact on society, hardware development is necessary.
The term “hardware is hard” comes from peoples’ experiences with challenges mentioned in the article however understanding some key concepts around its development can maximise the chances of ambitious founders succeeding.
The more we understand the differences between firmware and conventional software development the higher the chances of success are for hardware founders.
Useful Resources
Some really useful resources for me include:
Ben Eater’s “Building an 8-bit breadboard computer!” YouTube series is one of the best learning resources for understanding electronics and computers. Although this is not about firmware specifically, his first-principle approach to building the computer is incredible and really insightful.
Overkill Projects is a YouTube channel run by my former colleague and good friend, who is also an incredible firmware and electronics consultant and University lecturer. He is passionate about teaching and that comes through in his videos.
UK-based consultancies Embedism and Hard Stuff provide high-quality support tailored to startups.
Arduino is a great way to get started with firmware and embedded development. It was my first experience of electronics and firmware, when I used it for my dissertation project at University while studying Mechanical Engineering/Biomedical Engineering.
Hackster.io is a fun website which showcases hardware projects.
This is super helpful. Thanks